Written By

Fluent Frame Team
CEO, Fluent Frame
Date
Read Time
18 minutes

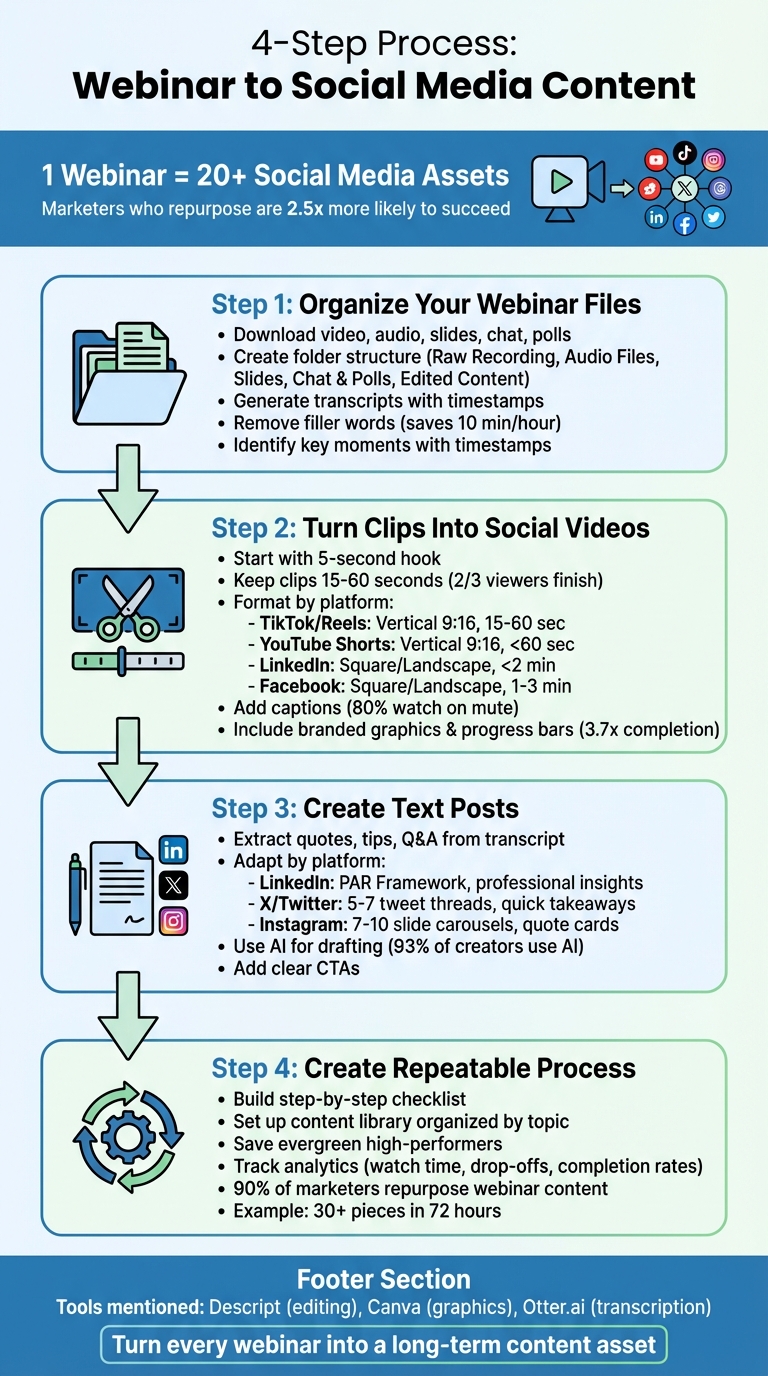
Want to turn your webinars into weeks of social media content? Here’s the secret: repurpose your webinar recordings. A single 60-minute session can generate over 20 social media assets - short videos, text posts, quote cards, and more. This strategy saves time, reduces costs, and helps you reach audiences who missed the live event.
Key Takeaways
- Repurposing Defined: Break your webinar into smaller content pieces tailored for Instagram, LinkedIn, TikTok, and YouTube.
- Why It Works: Marketers who repurpose are 2.5x more likely to succeed. Short videos perform especially well, as 80% of users watch videos on mute.
- Tools You Need: Affordable options like Descript (video editing), Canva (graphics), and Otter.ai (transcription) simplify the process.
- 4-Step Process:
- Organize your webinar files (video, audio, slides, transcripts).
- Create short, platform-specific video clips with captions and branding.
- Draft engaging text posts from key webinar insights.
- Build a repeatable workflow and centralize assets in a content library.
Pro Tip: Always include a clear call-to-action in your posts to drive traffic back to your full webinar or website. With the right system, every webinar becomes a long-term content asset.
How To Repurpose Your Webinar in Minutes with AI
Step 1: Organize Your Webinar Files
Keep all your webinar files in one place to streamline your workflow and avoid unnecessary delays.
Download and Sort Your Webinar Files
Start by exporting everything from your webinar platform - not just the video recording. Grab the audio-only file (perfect for podcasts), the chat history, poll results, and your slide deck. Poll results, for example, can be turned into engaging LinkedIn posts.
Set up a simple folder structure on your computer with clear labels like “Raw Recording”, “Audio Files”, “Slides”, “Chat & Polls”, and “Edited Content.” Some platforms, such as Wistia, automatically record and store sessions in a central account, saving you from manual downloads. If webinars are a regular part of your schedule, consider split-track recording for each speaker. This allows AI tools to switch camera views automatically, simplifying the editing process.
Once everything is neatly organized, you’re ready to turn those raw recordings into actionable transcripts.
Create and Edit Transcripts
Upload your recording to a transcription tool like Descript. It generates transcripts with speaker labels and timestamps, and it even lets you edit the video by tweaking the text.
Before diving into content creation, clean up the transcript. Remove filler words like “um”, “uh”, and “like.” Descript’s AI assistant can handle this for the entire recording, saving you up to 10 minutes per hour. Assign names to the speaker labels so it’s easy to track who said what. This polished transcript will serve as your go-to document for blogs, social media captions, and email content.
“AI is really good at analyzing and transcribing, so you can easily turn one webinar into 50 clips for your blog, sales materials, and social channels.” – Piotr Smietana, Director of Brand and Marketing Creative, Superside
With a clean transcript in hand, the next step is to uncover your webinar’s standout moments.
Identify and Timestamp Key Moments
Now that your transcript is ready, scan it for standout moments. Look for quotes, tips, and Q&A exchanges, and note their timestamps. For example, if a guest shares a great insight at 23:45, jot down the timestamp and a quick summary. AI tools can help by analyzing the transcript to highlight high-engagement moments based on sentiment and key concepts. Pay special attention to the Q&A sections - they often address audience questions and make excellent standalone clips.
“When looking for short video clips to create based on your webinar, think about two things: informational value and entertainment value.” – Lisa Marinelli, Creative, Wistia
With your files sorted, transcript cleaned, and key moments identified, you’re all set to start crafting engaging social media content. This groundwork will make the rest of your content repurposing process much smoother.
Step 2: Turn Webinar Clips Into Social Media Videos
Once you’ve pinpointed the standout moments from your webinar, it’s time to transform them into attention-grabbing social media videos. This involves trimming, polishing, and customizing clips to suit different platforms while adding visual elements to make them pop.
Choose and Edit the Best Moments
Focus on selecting clips that either provide valuable insights (like practical tips or key data points) or offer entertainment (such as surprising reactions or bold statements). Each clip should convey one clear idea that works independently.
Kick off each clip with a compelling 5-second hook. Start with something that grabs attention - a shocking statistic, a thought-provoking question, or a “did you know” statement. For instance, if your webinar covered conversion rates, you might lead with: “Did you know 89% of people say watching a video convinced them to make a purchase?”.
To streamline the process, tools like Descript’s “Find Good Clips” feature can help you quickly identify the most engaging moments from your transcript. Once you’ve chosen a clip, aim for a duration of 15–60 seconds. This length maximizes completion rates, as data shows two-thirds of viewers finish videos under 60 seconds, while longer clips see a significant drop-off.
If the clip lacks context, add a quick 3-second text overlay or a brief voiceover to provide clarity. Use AI tools to edit out filler words and maintain a fast, professional pace.
After polishing your content, the next step is tailoring it for each social platform.
Format Clips for Different Platforms
Different social media platforms have unique technical requirements, and adapting to these can significantly impact your video’s performance. For TikTok, Instagram Reels, and YouTube Shorts, vertical videos (9:16 aspect ratio) work best. On LinkedIn and Facebook, square (1:1) or landscape (16:9) formats are more effective.
| Platform | Aspect Ratio | Ideal Length | Content Style |
|---|---|---|---|
| TikTok / Reels | Vertical (9:16) | 15–60 seconds | Quick, “how-to” tips |
| YouTube Shorts | Vertical (9:16) | Under 60 seconds | Short tutorials, facts |
| Square (1:1) or Landscape (16:9) | Under 2 minutes | Professional insights, Q&A | |
| Square (1:1) or Landscape (16:9) | 1–3 minutes | Educational stories |
Adjust the length and format depending on the platform. Wrap up each clip with a clear call-to-action, like “Watch the full webinar on our website” or “Click the link in bio for the complete session.”
Add Captions and Branded Graphics
Since many users watch social media videos on mute, captions are non-negotiable. Tools like Canva can generate captions quickly, and dynamic text that highlights key phrases as they’re spoken can make your videos even more engaging.
Stick to high-contrast colors and simple, easy-to-read fonts - avoid overly decorative styles that might be hard to read on smaller screens. Use a safe zone filter to ensure captions aren’t obscured by platform interface elements like usernames or reaction buttons.
Consistent branding strengthens recognition across platforms. Add your logo, brand colors, and custom fonts to each video. Including a progress bar at the top or bottom of the clip can also boost engagement, as viewers are more likely to finish a video when they can see how much is left. In fact, progress bars have been shown to increase completion rates by 3.7x. Canva offers templates that make it simple to apply these branding elements across all your content.
Step 3: Create Text Posts From Webinar Content
Video clips are great for grabbing attention, but turning your webinar into short, engaging text posts can help you reach a broader audience. Platforms like LinkedIn, X (formerly Twitter), and Instagram cater to users who prefer reading, making text posts a great complement to your video strategy.
Pull Key Points From Transcripts
Start by reviewing your webinar transcript to find standout moments - quotes, useful tips, data highlights, or engaging Q&A exchanges. The Q&A section is especially valuable because it often addresses specific concerns or questions that might not have been fully explored during the presentation. For instance, if someone asked about ROI timelines, you could create a LinkedIn post that dives deeper into that topic.
Posts featuring specific numbers or industry trends tend to perform well and can help establish credibility. AI tools can help you organize your transcript into main themes, which you can then expand into a series of posts or even a multi-part thread. For example, a single webinar could yield several posts focused on different aspects of the discussion.
Once you’ve identified the key points, it’s time to tailor the content for each platform.
Adapt Posts for Each Platform
Each social media platform has its own style and audience expectations, so your posts should reflect that. Here’s how to approach some of the most popular platforms:
- LinkedIn: Highlight professional insights using the PAR Framework - start with the Problem, describe the Action taken, and end with the Result. Hook readers within the first few lines to encourage clicks on the “see more” link. Follow up with actionable insights and conclude with a question to spark engagement.
- X (Twitter): Focus on concise, impactful takeaways. Threads of 5-7 tweets work well, with each tweet covering a single key point. Start with a surprising statistic or counterintuitive statement to grab attention, and keep hashtags to a minimum.
- Instagram: Combine text with visuals. For carousels, aim for 7-10 slides, starting with a strong hook on the first slide. Pair memorable quotes with speaker photos for added impact, and ensure text overlays take up less than 20% of the image area.
Here’s a quick comparison of platform strategies:
| Platform | Optimal Format | Content Focus | Key Tip |
|---|---|---|---|
| Text posts, carousels | Professional insights, case studies | Hook readers in the first few lines | |
| X (Twitter) | 5-7 tweet threads | Quick takeaways, conversation starters | Start with a surprising statement |
| Quote cards, carousels | Visual storytelling, step-by-step tips | Keep text overlays under 20% of the image |
Instead of summarizing your entire webinar in one go, consider breaking it into a 3-5 part micro-series shared over several days. This keeps your content fresh in users’ feeds and strengthens your presence on the topic.
Use AI to Draft and Edit Posts
AI tools can make drafting social media posts faster and easier. Tools like ChatGPT, Claude, or Descript’s Underlord assistant can take sections of your transcript and turn them into polished posts. For example, you can prompt AI with instructions like:
“Write a 5-tweet thread in a conversational tone, highlighting three actionable tips for marketers.”
AI can also create “TL;DR” summaries of your webinar’s most impactful moments, which work well as hooks for LinkedIn or X. Pair these summaries with slides from your webinar deck to spark curiosity and drive clicks.
While AI can save time - 93% of creators use it for faster content generation - don’t skip the human touch. Always review and refine AI drafts to ensure they reflect your brand voice and feel authentic. Tools like GPTHuman (starting at $8.25/month for 25,000 words) can help fine-tune AI-generated content to make it sound more natural.
Finally, make sure every text post includes a clear call-to-action, such as directing readers to the full webinar recording or a related resource. This not only drives engagement but also helps you maximize the return on your webinar investment.
Step 4: Create a Repeatable Process
Repurposing just one webinar can transform your content strategy. Did you know that 90% of marketers repurpose webinar content? A structured workflow ensures you can consistently generate fresh social media content without starting from scratch every time.
Build a Step-by-Step Checklist
A checklist is your best friend when it comes to keeping your repurposing process on track. Break it down into four phases: Strategy, Content, Production, and Distribution.
Take a page from GTM LABS, which turns a single webinar into over 30 pieces of content - think 5–7 LinkedIn posts and 10–15 video hooks - all within 72 hours. They also review performance weekly to refine future content. This speed and efficiency come from having a standardized process.
To stay organized, create a content matrix. This can track who’s responsible for each asset, the target audience, the length of the content, and its scheduled publication date. Here’s what your checklist might look like:
- Download the webinar recording within 24 hours.
- Use AI tools to generate transcripts.
- Highlight 3–5 key moments with timestamps.
- Create platform-specific video clips.
- Design branded quote cards.
- Schedule posts across a staggered timeline.
“Create less, repurpose more. Every live event should spawn a stack of social assets that keep delivering value long after the lights go out.” - Arpita Lenka, Komet Media
Batch-processing assets can save time and ensure consistency. For example, instead of editing individual clips one by one, dedicate a session to creating all quote cards or video snippets for the month. A staggered release plan might start with a Twitter thread the same day as the webinar, followed by an Instagram Reel the next day, and a long-form video or infographic a week later.
Once your checklist is polished, the next step is to centralize your assets for easy access.
Set Up a Content Library
A well-organized content library is key to reusing and repurposing assets efficiently. Create a central folder - your “source of truth” - to store raw transcripts, annotated timestamps, slides, and all finalized assets. This ensures your team always has access to the right materials.
Organize your library by topic, audience, or campaign goals to make it easy to find what you need. For instance, you could have folders like “Customer Success Stories”, “Product Demos”, or “Industry Trends.” Each folder should include a mix of video clips, text posts, and graphics, so you can quickly assemble a cohesive campaign.
Keep high-performing assets in an “evergreen library”. These are the posts, clips, and quotes that consistently drive engagement or conversions. You can reuse them for future campaigns, sales materials, or email sequences. Tools like Airtable can help you track ideas, deadlines, and performance metrics.
Don’t forget to save final versions of your clips in both physical and cloud storage. Apps can crash, and losing hours of work is a headache no one wants. A well-maintained library also simplifies onboarding for new team members or freelancers.
Once your assets are organized, it’s time to analyze their performance for continuous improvement.
Use Analytics to Improve Your Content
Analytics are essential for refining your strategy. Start by reviewing the original webinar’s watch time and drop-off points. This helps you identify the most engaging segments to clip for social media. If a specific section consistently loses viewers, skip it in your repurposed content.
Dive deeper into format-specific data, like comparing video completion rates to carousel swipe-through rates. This will show you which formats resonate most with your audience.
For example, Wells Fargo streamlined its social media and customer service analytics by consolidating data from four tools into one platform, Sprinklr. According to David Encizo, VP of social media marketing technology and operations, this shift not only saved millions but also improved decision-making with real-time insights and competitive benchmarking tools.
“Benchmarking is a silent win that snuck in… dashboards are an effective way to present data to leadership. We get a ton of questions like, ‘How do we stack up against this or that?’ and the ease with which we can add additional brands on the fly is why adoption has been really significant.” - David Encizo, VP of social media marketing technology and operations, Wells Fargo
Use UTM parameters and GA4 download events to track how your repurposed social posts contribute to lead generation and SQLs (sales-qualified leads). Weekly reports can guide short-term adjustments, while monthly and quarterly reviews help with broader strategic planning.
This cycle of tracking, refining, and improving ties back to your workflow, ensuring your content strategy keeps evolving and delivering results.
Conclusion
Transforming your webinar content into social media posts is a smart way to squeeze every ounce of value from your efforts. A single 60-minute webinar can easily be turned into more than 20 pieces of content, including clips, blog posts, and social media threads.
This guide’s four-step approach - organizing files, creating video clips, drafting text posts, and establishing a repeatable workflow - makes what could be days of effort feel manageable and efficient. As Braveen Kumar, a writer and marketing consultant, explains:
“With AI in your workflow, extracting maximum value from every webinar becomes not just worthwhile - it becomes practical”.
By following this method, you not only save time but also lay the groundwork for a sustainable content strategy.
Consistency is everything. When you document your process, centralize your materials in a content library, and use analytics to track performance, you create a system that grows stronger over time. High-performing clips can be saved and reused, while insights from one webinar can guide your approach for the next.
Tools like Fluent Frame make this process even easier by automating transcription and identifying key clips. This ensures your content remains polished across platforms without requiring advanced editing skills or hours of manual work.
FAQs
What’s the best way to repurpose webinar content for social media?
To make the most of your webinar content, start by pinpointing standout moments from the recording. Look for compelling quotes, key data points, or memorable takeaways that can resonate with your audience. Tools like AI-powered editors can help you quickly pull these highlights and transform them into shareable social media content.
For video-based platforms, consider creating short, vertical clips (15–60 seconds) tailored for Instagram Reels, TikTok, or YouTube Shorts. Add captions and include a clear call-to-action to drive engagement. For something more visual, design quote cards featuring the webinar’s best insights using tools like Canva. Be sure to stick to your brand’s colors and tone for consistency. On text-driven platforms like LinkedIn or X (formerly Twitter), break the webinar into bite-sized posts, threads, or carousel slides to make the information easy to consume and share.
Once your content is ready, use a social media scheduling tool to post at the best times, like mid-morning (9:00 AM–11:00 AM EST). Keep an eye on performance metrics such as engagement and shares to understand what resonates most. By taking this approach, you can transform a single webinar into a variety of engaging posts while maintaining a cohesive message.
What are the best tools to turn webinar content into social media posts?
To turn webinar recordings into captivating social media content, AI-powered tools can make the process smoother and faster. For instance, tools like Descript let you pinpoint standout moments, trim clips, add captions, and export videos optimized for platforms like Instagram Reels, TikTok, or LinkedIn. Similarly, Simplified’s video editor makes it easy to break down webinars into bite-sized, shareable videos perfect for reels, stories, or even Twitter threads.
These tools not only save time but also help you produce polished, platform-ready posts that align with your brand’s voice.
How can I make sure my webinar content works well on different social media platforms?
To make sure your webinar content fits each platform’s unique style and technical requirements, start by understanding what works best for each. For instance, Instagram Reels and TikTok thrive on vertical 9:16 videos that are under 30 seconds, while LinkedIn supports landscape 16:9 videos lasting up to 3 minutes. Match your content to the platform - think quote cards for LinkedIn or quick, attention-grabbing clips for TikTok.
Leverage tools like Descript to trim videos and add captions or Canva to resize and brand your visuals. Don’t forget to include platform-specific elements, such as captions (since many people watch videos on mute), a compelling hook within the first 3 seconds, and a clear, actionable CTA. Before hitting publish, test your content in draft mode to confirm the aspect ratio, resolution, and file format are correct. Keeping your brand’s colors, logo, and tone consistent across platforms will ensure your content looks polished and professional everywhere it’s shared.
Ready to grow your audience without spending hours on manual editing?
Fluent Frame uses AI to automatically turn your long-form webinars and videos into dozens of social-ready clips, complete with captions, b-roll, and optimized formatting for TikTok and Instagram.
Stop editing and start growing. Try Fluent Frame today and get your first clips in minutes, or book a call to learn how we can help.